
Preparing the property:
Pay attention to everything. Did you get the property professionally cleaned inside and out? Check woodwork, fixtures, fittings, lights, switches, even rust and weeds in the garden.
Areas that require attention and are inexpensive to fix are worth going the extra mile for. The return on your time, effort and investment is worthwhile.
The Which? Property Viewing Checklist is everything a buyer will potentially be checking, so let’s make sure you have addressed them all before the buyer gets a chance to (and maybe use them as leverage for a price reduction!).
It’s not rocket science. Just a bit of care and attention to detail is all it takes to get a better perspective – and don’t forget to pay attention to the outside just as much as the inside.
Thinking of this part of the process as the beginning of your moving out means this is a perfect opportunity to start storing items away into moving boxes as you count down and move closer to your moving-out date.
Taking great photos:
Taking great pictures requires a basic understanding of angles and heights – as well as taking shots from the knees. Take lots of pictures, making sure you get as much of the room as possible in the frame, without having to mislead anyone.
Including a little of the ceiling, for example, creates height in your photos. Shooting from a lower vantage point will help to show some distance and a different perspective. Google “how to photograph interiors like a professional” and you’ll find lots of sites offering free advice.
Choosing your best shots:
Once you have finished taking shots of each room, including outside, and you’re happy that you have enough, go through them all just like a professional photographer would. 100 photos yield about 10–20 perfect shots.
That’s why you see the pros offering packages of 100, 200 or 300 photos – they know that out of all the shots they’ve taken, only a small percentage will make the cut. The same applies to yours.
Are your photos perfectly framing each room in the way you want? Do you need to do any re-takes? Is there enough lighting? Did you use the flash in the darker rooms with not much light? Imagine looking at your photos as a buyer. Are you impressed? If not, why not?
Once you are happy with all your photos, select ONE as your “WOW” shot. This photo will be used as your main picture in your advert.
Video and reels
We don’t recommend you do a property video unless you are familiar with doing them professionally. Recording a professional video takes a lot of skill and expertise. If you want a video, we recommend you find a professional property videographer to do it for you. This can be quite expensive, but it’s worth doing if the video would better showcase the size and/or character of the property.
A great compromise is to learn how to do a reel. Reel tools can be found on Instagram and Facebook when you “create a new post”. Reels are short-form, vertical videos of up to 60 seconds long.
You can add all your photos and select your own timings, so a buyer can see short, sharp bursts at three-second intervals, and you can add music and effects if you want to. Reels can be a lot of fun to put together, and they give the illusion of a much shorter and more effective marketing tool.
Why include a floor plan?
Showing a floor plan in your house sale advert can significantly boost interest and help sell your property faster. Here’s why it works so well.
- Floor plans make a big impact in property adverts because they give buyers something photos alone can’t: a clear understanding of the space.
- Clarity and transparency – buyers can instantly understand the layout, room sizes and flow of the home. It removes guesswork and builds trust.
- Better online engagement – listings with floor plans tend to get more clicks and longer viewing times. People love visuals that help them imagine living there.
- Helps buyers visualise potential – a floor plan lets buyers mentally place furniture, plan renovations, or see how their lifestyle fits the space.
- Saves time for everyone – buyers who don’t like the layout won’t waste time booking a viewing. Those who do are more likely to be serious.
- Professionalism and perceived value – including a floor plan makes your listing look polished and well prepared, which can suggest the home is worth more.
- Supports remote buyers – especially useful for people relocating or buying from afar, as they can assess the property without being physically present.
Floor plans are particularly helpful if the property is larger than average or has an unusual design. In these instances, a floor plan will most definitely help and will likely generate more enquiries.
Create your own floor plan:
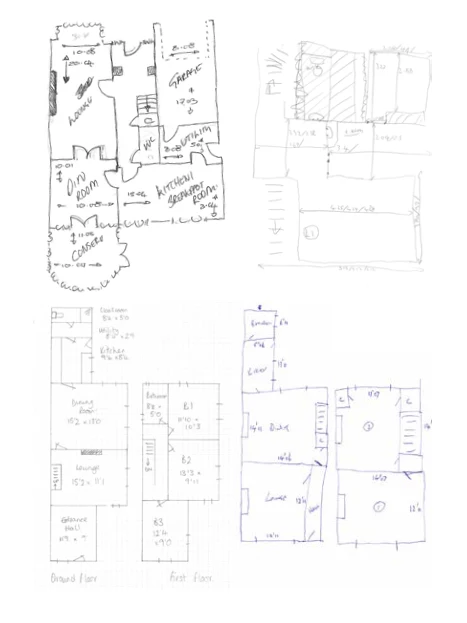
You have the option to create your own floor plans using our Floor Plan feature, available when completing the property listing feature.
This service is offered at a fixed fee of £29 (an amazing limited-time offer!), regardless of the property’s size. All you need to do is draw a rough sketch with your measurements (examples provided below), upload it to your account, and you will receive a professional floor plan within 72 hours.